Christmas wasn't always a celebration of Jesus for me. Christmas was about love; it was about family; it was about peace on earth and good will toward men. All these things are good things. But, I first understood the true meaning of Christmas 10 years ago, when I made a choice to follow the teachings and the love of Jesus. My life attitude has been very different since then and many of my life activities have changed. I wouldn't say that life is easier, in fact, in many ways it's more difficult as I wrestle down my faults and do my best to show God's love through my actions. I still have many challenges and struggles and I am very humanly flawed, but I know that I am not doing it alone. My struggles are building my character and teaching me about faith. God provides me with His guidance through it all (hopefully I'm listening) and I frequently find myself leaning on Him for support during the trials of life. I am ever grateful that I can put my life in His hands knowing that He sees the bigger picture and has ultimate and intimate understanding of my thoughts and experiences.
What is the true meaning of Christmas in your life? I know that everyone does not believe the same as I do. I hope that you will take a moment to reflect on this season... Is it about the presents under the tree? I love the tradition of giving and receiving and being thankful... Or is it more about spending time with the ones you love, making amends, maybe offering grace for their shortcomings (we all have them), and showing them how much you love them and how grateful you are for having them in your life? ... Or maybe you struggle at Christmastime. Maybe it brings with it a sadness; some loneliness, maybe some bitterness. I hope not. I hope that you will find peace this season. I hope you will find joy. I hope that you will discover a deeper meaning, far beyond the commercialism which envelopes our Christmas celebrations.
Merry Christmas to you and yours wherever you are. I wish you peace and joy at this special time of year.
Wednesday, December 26, 2007
Wednesday, December 19, 2007
How to Use the Stamp-a-ma-jig
I made good use of my Stamp-a-ma-jig while making my Christmas cards this year. When used properly, it's a great tool to help you position your stamp images with precision. No more crooked words! It's great if you're looking for precise overlapping of images also. Here's a little tutorial to show you how it works:
 1. Start by lining up your clear image sheet into the side of your "jig" being sure it's neatly tucked in and flush with the edges.
 2. While holding your jig and the clear sheet steady, line up your stamp flush and snug into your jig and slide it down to stamp your image on the clear sheet.
 3. The clear sheet then becomes your guide for positioning your stamp onto your project.
 4. Lay your clear sheet over your project to where you want the image to be. Then line your jig up snug as you did before while you hold your image sheet in place over your project.

5. Remove the imaging sheet while firmly holding the jig in place.
 6. In the same fashion as you did when stamping on the clear sheet, you will hold the jig firmly in place, line up your stamp flush and snug into the jig and slide the stamp down to stamp the image on your project.

 1. Start by lining up your clear image sheet into the side of your "jig" being sure it's neatly tucked in and flush with the edges.
  2. While holding your jig and the clear sheet steady, line up your stamp flush and snug into your jig and slide it down to stamp your image on the clear sheet.
  3. The clear sheet then becomes your guide for positioning your stamp onto your project.4. Lay your clear sheet over your project to where you want the image to be. Then line your jig up snug as you did before while you hold your image sheet in place over your project.
5. Remove the imaging sheet while firmly holding the jig in place.
 6. In the same fashion as you did when stamping on the clear sheet, you will hold the jig firmly in place, line up your stamp flush and snug into the jig and slide the stamp down to stamp the image on your project.
I love how little effort it took to center my "noel" onto my card!
Thursday, December 13, 2007
MORE Christmas Cards!!

After making 40 cards for all of the people involved in the Christmas production, I had to do all of the Christmas cards for my family and closest friends. I got the idea for these cards from kwernerdesigns and adapted it for the supplies that I had on hand (thankfully, I took great advantage of last month's Stampin' Up! promotion and got loads of paper!...phew!!) I also needed them to be simple so that I could make them quickly.

I like how they turned out, but I ended up destroying my Coluzzle cutting mat doing all those special circles. I think my blade had gotten dull with use and it ended up tearing through my mat. I think I can get a replacement at a local craft store without having to re-purchase my whole Coluzzle kit.
Some of the red ones with the green ribbon remind me of Norwegian artwork and designs (my Great-Grandmother came to Canada from Norway). I think for that reason those ones are my favorites.

Tuesday, December 4, 2007
40 Cards!

 I made 40 cards for our cast and crew to thank them for doing such a great job in our Christmas play at our church. We performed a play called "The Best Christmas Pageant Ever". It was a hoot!! Everyone in the cast had to play kids, so it was a great excuse to goof off and have a lot of fun. I wore high pigtails, a cute little skirt, freckles, false eyelashes, and LOTS of dark pink (kind of like this Rose Red paper).
 This photo shows some of the color combos that I used for my cards. The ones with the Rose Red and the Not Quite Navy cardstock base are probably my favorite combinations. I started out by using the Flannel background stamp, but when I used my Print Patterns background stamp, I liked the playful look it made better. After stamping the snowflake from the Perfect Presentation hostess stamp set, I inked the entire 1-1/4" square of paper with Versamark and heat embossed the paper with iridescent ice embossing powder. It added a touch of glitter, which just seems to make a Christmas card complete.
Now I have to get my butt in gear and make another 50 or so Christmas cards to send out to my family! I better get a move on!
Even though it's such a busy time of year....I LOVE Christmas!!!
Monday, November 26, 2007
WHAT IF YOUR INK PAD COMES APART!!
A friend of mine called me up with great concern over her retired Vintage Violet classic ink pad. The silly thing had come apart and she couldn't get it together again...it would dry up if she couldn't get it to go together soon!
Have you had that happen? It takes a bit of figuring to get it back together with the cool sliding mechanism designed for Stampin' Up! ink pads. The design allows the ink pads to be upside down when stored which keeps the surface of the pad moist.
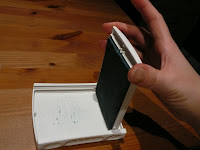
I tried explaining how to put it back together again over the phone, but without a visual, it was pretty confusing. In the meantime, she wrapped it in plastic wrap. So, here it is. I hope it's helpful.
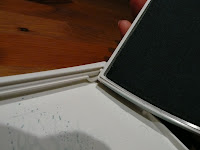
The pictures say more than I can. This first photo (figure #1) shows which ends to put together. The "outy part of the ink side goes into the inny part of the non-ink side" (I think that's about what I told my friend over the phone). Notice the sliding track where the "outy part" goes and that it goes in the end of the ink pad base that has the semicircle below the track.
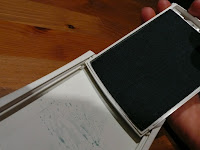
In figure #2, I'm trying to show how you "walk" the other "outy part" forward to fit it into the track.
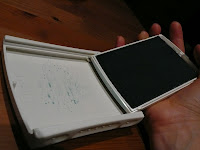
Then slide that second side back into the track while keeping the first side in its place as well (figure #3). Make sure you slide it as far as you can before trying to flip it back closed again.
Have you had that happen? It takes a bit of figuring to get it back together with the cool sliding mechanism designed for Stampin' Up! ink pads. The design allows the ink pads to be upside down when stored which keeps the surface of the pad moist.
I tried explaining how to put it back together again over the phone, but without a visual, it was pretty confusing. In the meantime, she wrapped it in plastic wrap. So, here it is. I hope it's helpful.
Figure #1
The pictures say more than I can. This first photo (figure #1) shows which ends to put together. The "outy part of the ink side goes into the inny part of the non-ink side" (I think that's about what I told my friend over the phone). Notice the sliding track where the "outy part" goes and that it goes in the end of the ink pad base that has the semicircle below the track.
Figure #2
In figure #2, I'm trying to show how you "walk" the other "outy part" forward to fit it into the track.
Figure #3
Then slide that second side back into the track while keeping the first side in its place as well (figure #3). Make sure you slide it as far as you can before trying to flip it back closed again.
Figure #4
Finally, you can flip the lid over to close it. (figure #4)
So, if you happen to have the Stampin' Up ink pads, this may one day be something that you have to do for yourself (you may have already done it). Just come back here and hopefully, these instructions will walk you through it.
Friday, November 23, 2007
Acetate Christmas


Can you say "Amy likes old olive!" Ya, I know, but old olive is just right for all things Christmas. I'll try to make my next card without olive, I promise!!
This one is made by stamping and embossing on acetate (overhead projector sheet). I used whisper white craft ink and embossed with iridescent ice embossing powder using my new Perfect Presentation hostess stamp set. Note: when embossing on acetate you need to be very careful not to overheat as you could melt the plastic. I then used my coluzzle cutter to make the oval window (textured soft sky and a piece of brocade background designer series paper). The paper piercing around the window didn't add as much as I'd hoped. The background stamp on the olive was done while masking off the oval centre so that the area behind the acetate would be plain.
Try embossing on acetate. It's a great effect!
Tuesday, November 20, 2007
Blog Candy Winner!!
I loved reading about all of your Christmas traditions. Some brought a tear to my eye as I thought of my own family and our traditions. I look forward to carrying ours on and creating new ones with my own family. I think my favorite Christmas tradition is Christmas eve. We always get together with an array of finger foods and treats, some tasty drinks (once I was old enough), and sit by the fire (a real one) with the Christmas tree (also real) lights twinkling. We'd visit and joke, often enjoying a special Ice Wine or Port (once I was old enough). I still look forward to that evening every year. As a child I also enjoyed being able to open our stockings before anyone else was up Christmas morning (we always had to wait for my oldest brother to get up...I think he did it on purpose), and I especially loved getting up before everyone else, turning on the Christmas tree lights and, with the rest of the house still dark and quiet, sitting or lying at the foot of that tree and bathing in its glowing delight.
Congratulations to the winner of my first blog candy offer!!!
CAKVD said...
OMG!!! I LOVE all these SU goodies!!! My favorite tradition is getting together to decorate the Christmas tree. We are all happy and together (even the cat joins in!)Thanks!Cheryl KVD
If you could email me your mailing address, I will send your candy asap.
CONGRATULATIONS!! And thank you everyone for sharing.
Friday, November 16, 2007
BLOG CANDY!!

Whooohooo! I've got over a thousand hits on my blog! Thanks everyone for visiting me!
I am pleased to offer my first blog candy. For a chance to win this assortment of Stampin' Up! and non-Stampin' Up! items, I would like you to leave a comment telling me what your favorite family Christmas tradition is and why. I'll draw the winner on Tuesday, Nov. 20th.

Among the loot:
-heavy weight stickers
-In Colour cardstock sample pack with coordinating ribbon
-Stampin' Dimensionals
-technique booklet
-cut and scored note cards and envelopes (very vanilla)
-rub-on transfers
-a couple cute stamps
-assortment of brads, buttons, flowers, and scallop circles.
Thursday, November 15, 2007
Happy Birthday to Melanie!


I made this card using the same card base as was used for my Christmas tree card on the previous post. The scalloped window is from Stampin' Up!'s "Accents and Elements" tin of stickers made with heavy weight paper. This one is from the Borders and Blossoms tin which are all in easy to use neutral colours.
I added depth to the card using Stampin' Dimensionals to pop-up the scalloped window. The image is a hostess set (Oh, So Lovely) which I first stamped on Soft Sky textured paper with Blue Bayou ink. Then I stamped the same image on my watercolour paper using Stazon black ink, coloured it with a blender pen and ink pad, and punched it out with a circle punch so it would fit behind my window.
I black embossed my Happy Birthday sentiment (from "It's Your Birthday" stamp set). Embossing adds such a nice finished look to projects. Another technique I often use is tearing my paper as I did with my layers at the bottom of this card.
This card uses River Rock, Soft Sky, Blue Bayou, and Purely Pomegranate.
Tuesday, November 13, 2007
HIT ME!!
Okay folks, I'm just not getting enough hits on this blog!
Soooooo....I'm going to give away some blog candy, but if you want it, you have to help me get to 1000 hits on my counter!
Seriously, it will be some great blog candy, you won't want to miss it.
Once I hit 1000, I will post what the candy will be and what you'll need to do to win it.
Spread the word about my blogsite and I'll do my best to post something at least once per week for you to look at.
Tuesday, November 6, 2007
Chistmas Tree


I just love this origami tree that Melanie showed me last year. It adds such beautiful depth to a card. This card was done for my open house. Again, I just love the pomegranate/old olive combo. And doesn't the Bravo Burgandy ribbon look lovely with the Purely Pomegranate paper. I was so excited to discover that colour combination. I used River Rock cardstock for the base and cut the card so that the back was wider than the front. I used old olive and purely pomegranate layered on the front with the 5/8" bravo burgandy grosgrain ribbon. The tree is made with the brocade background designer series paper. The background of the pomegranate paper is stamped using pomegranate ink with the flannel background stamp (a favorite for me at Christmas). The Season's Greetings is from Many Merry Messages stamp set and was heat embossed black. I was so pleased with this one. My husband helped me a bit...I had originally left the pomegranate blank and he suggested to add some sort of subtle background. I wonder if he might be a closet stamper. hehe.
Okay, I'm planning to do some blog candy when I hit 1000 on my counter. Be ready and I will post it properly when the time comes.
Wednesday, October 24, 2007

I've always loved Old Olive and Real Red for traditional Christmas cards. I was very happy with this card. I think some of my influence came from a friend of mine (you always make such classy cards, Gwen).
Here I used my Print Pattern background stamp with old olive ink on my old olive card stock. I then used a sponge (again with old olive ink) for the shading all around the card base as well as the white cardstock. The stamp is from the level one hostess set, Sidekick Sayings. I used my Stampin' Up! markers to colour the words in real red and old olive, then used my basic black ink pad to ink the tree. After stamping the image, I coloured it with my Stampin' Pastels chalk set using a blender pen as my application tool. I then added the wide grosgrain real red ribbon, adhered the white cardstock to the base with Stampin' Dimensionals. Finally, to balance the card with colour, I added the three real red brads in the top left corner of the card using my handy dandy Stampin' Up! Mat Pack to help me line them up nice and evenly.
Thursday, October 18, 2007
My First Shaker Card
A friend of mine gave me some stuffing from inside a pillow. She used it for snow in a shaker card, so I thought I'd try it for myself. After making the shaker portion of my card, I needed to figure out what to do with it. I was a bit bored with my usual card layouts, so I headed off to the Splitcoast Stampers web site and looked at their Card Sketches weekly challenges. I came across challenge #110 and thought I'd give it a try.

I fell in love with the combination of colour on this card; particularly the purely pomegranate with the old olive. They are such a beautiful and rich colour combination, don't you think? I also used soft sky and textured certainly celery which, unfortuneately takes away a little bit from the rich colour, but I still love how it turned out.
Monday, October 15, 2007
And now for something completely different...

This is a slight deviation from stamping, but I did use Stampin' Up! wide old olive grosgrain ribbon.
I was in my garden trying to get some things under control and I began cutting back one of my lavendar bushes. As I was trimming it, I was thoroughly enjoying the scent of the leaves and remaining flowers. I thought "how can I just throw these in the compost bin?" and I decided then that I would do something with them so we could enjoy the scent in our home. I found some old floral wire and began aimlessly bunching and wrapping until I ended up with a wreath. Then with some manipulation and adjustment I managed to make it look pretty good. I did a final wrap with a thin black satin ribbon that I got at Walmart mostly to distract from the wire. Then, of course, I used my SU olive ribbon as an accent.
My husband insisted that we hang it upstairs where we can always enjoy the fragrance! I love bringing the outdoors into my home. Eventually the colour will fade and it will get dusty, but the scent will hold for quite a while, even after it's dried, I think. I'm pretty happy with it for a first attempt at making a natural wreath.
Saturday, October 13, 2007
Origami Box
 I thought I'd try the origami box, but with an acetate lid. I think it turned out quite pretty. I used the Real Red cardstock for the base and embellished the lid with wide old olive grosgrain ribbon and a buckle from my pewter Hodgepodge kit. I attached the buckle with the same method I showed you in one of my earliest posts, then used a couple of glue dots strategically placed to keep it secure. This box would make a great gift filled with chocolates.
 Check out the directions for an origami box from kwernerdesign. She has been doing video on her blog for mini tutorials!
Wednesday, October 10, 2007
Little Christmas gift boxes


Last year I did a grand Christmas Stamping party in my home. Here are a couple of the gift boxes I made to give as door prizes. I love being able to have a door prize for every person who attends.
Hmm...I'm pretty tired at the moment. My son had a one hour nap this afternoon and now is unable to sleep (it's 90 minutes past his bedtime) so I haven't been able to accomplish much this evening. I'm afraid I haven't anything intelligent or inspirational to say...
I hope you like my boxes.

Sunday, September 30, 2007
Acetate Card

Acetate cards are a nice change from the usual cardstock base that we have become so accustomed to. It can be finicky at times: lining up cardstock paper with the acetate between; stamping on the slippery surface while being careful not to smudge your image; trying to avoid getting fingerprints on the acetate; creatively covering up visible adhesive on the opposite side of your clear acetate. But it's worth the effort for a special card. I have seen some of the most beautifully stunning cards made with acetate. You can purchase acetate (overhead projector sheets) from an office supply store, such as Staples.
Friday, September 21, 2007
RIBBON SAMPLERS until Sept 30th
I have a very special LIMITED TIME offer for you. Everyone likes the Stampin' Up ribbons, but it's hard to start collecting all the different types and colours. Where do you start? Well, the perfect place to start is to purchase a Ribbon Sampler.
This is how it works: Instead of the huge expense of buying all of the ribbons so that you have an assortment to choose from, you can buy a grouping of ribbons by the yard! Here are the collections and prices for each yard. If you would like, you can buy more than one yard (when my Stampin' Up demo did this over a year ago, I bought 3 yards of all of the gingham ribbons and am still enjoying the benefits of having this selection.)
1 yard each of:
1/4" grosgrain ribbon collection-----$9.46*
5/8" grosgrain ribbon collection-----$7.78*
Tafetta ribbon collection------------$9.94*
In Colour Double Stitched-----------$6.74*
Gingham ribbon collection-----------$5.72*
*BC taxes and shipping are included in the price. If you are out of my area, we can work out the cost of mailing it to your home.
If you get all of the collections at once, I'll give you the gingham collection for free!!
I would like to order these by the end of the month, so please contact me before Sept 30th if you're interested!
Saturday, September 15, 2007
Dyeing Ribbon and Flowers
 In my recent technique class, I showed everyone how to dye ribbon and the flowers from the Stampin' Up! Pretties Kit. With the moose card, we used a direct to ink pad technique to saturate our ribbon with color (wild wasabi). For the happiness card, we used a solution of Soft Sky ink refill and water and dipped our flower and ribbon to achieve a great color match (ratio was 50 drops of ink to 1 tsp water). I have to say, I much prefer the results with dying tafetta ribbon than grosgrain ribbon. The grosgrain doesn't seem to dye as evenly which isn't very noticeable with lighter colors, but definitely is visible with darker tones.
Sunday, September 9, 2007
Christmas Ball Ornament
 Well, I have officially begun my Christmas crafts. Here is the first for this year.
I can remember doing these with old greeting card paper in elementary school and I recently saw a kit for one in a scrapbooking store in Abbotsford. That one was a bit bigger, but the basic principles are the same and it really didn't take as long as I thought it would.
In this case I used my 1-3/8" circle punch to make 20 circles out of my Baroque designer series paper from Stampin' Up! Then I scored each circle with three lines so that it looks like a circle with an equilateral triangle drawn inside it with each corner of the triangle touching the edge of the circle. Then the edges are folded in at each score. Each of these folded circle/triangles are then glued together by the flipped up edges until you have a sphere. After that you just get creative with attaching a ribbon so you can hang it from a tree or a garland! I used the lovely chocolate taffeta ribbon.
The next one I make will be a bit bigger and I'm going to try it with my Cerise designer series paper. It will look more festive with some real red, don't you think?
Sunday, August 12, 2007
Another way to Attach Ribbon
I was playing around with my new 5/8" old olive ribbon and was pleased to find a new way to attach it to a card with my hodge podge hardware buckle. I love how it looks.
I started by wrapping the ribbon around the back of the cardstock as is often done when you are going to simply tie ribbon to your project. In these photos I have glued two pieces of ribbon to either side of my paper rather than wrapping it all the way around the back. This is one way that you can make your ribbon last a bit longer.
1. pull both ends of the ribbon up through one side of your hodge podge hardware buckle

2. then pull both ends of your ribbon down through the other side of your buckle.
 3. tighten the ribbon by alternately pulling on each end of ribbon gently while securing the buckle with your other hand
 4. And you have a lovely way to apply a ribbon so you can make fun cards like this:
 This card is made with groovy guava textured cardstock that was run through my friend's Cuddlebug. This little gadget does some beautiful embossing. The flowers are from the hostess stamp set "Oh, So Lovely" which were coloured with cameo coral and old olive Stampin' markers. I framed this with old olive cardstock tearing the bottom and applying it with dimensionals. Finally, I used a stamp from "It's Your Birthday" to put on the Happy at the bottom of the page. I must admit that I am quite happy with how this turned out.
![]()
Let me know what you think!
Monday, July 23, 2007
A Great Time!!


I had a really great time at my Stampin' Up party in my home. Thank you to everyone who came. I'm glad that I was able to provide door prizes for everyone of you and that you were able to take advantage of 15% off of one item in your order. I loved having you in my home to share my obsession with stamping!
Congratulations to Shirley who won the draw for a free stamp set;
to Karen who won the draw for the hand-crafted lunch box tin;
and to Seana who won the draw for the hand-crafted card storage tin.
Now I can start making new tins for my next gathering in October!!
Now I can start making new tins for my next gathering in October!!
Hope you can join me then for more fun!! 


Thursday, July 19, 2007
Sneak Peak for Upcoming Mini Catalogue
Check out this sneak peak for the upcoming Stampin' Up Holiday Mini Catalogue with new products available Sept 1 -Nov 30th. All of the stamp sets in this mini are die cut, so no rubber trimmings for you! Look to the left of this page for the link to the mini. One of the stamps is a double sided background stamp. Check it out!
Thursday, July 12, 2007
The New In Colors


The new In Colors with Stampin' Up are growing on me. I have to admit that I wasn't ready to give up the old In Colors and didn't get too excited about the new In Colors. Now that I've had a chance to use them, I'm much more excited about them. I love how they are so easy to coordinate with each other. I'm also really excited about the new textured cardstock! I just put in an order for some, so if you come to my home for my Stampin' Up party on July 21st, you can have a look for yourself!
Monday, June 11, 2007
Join me in my home on Saturday, July 21st at 6pm for a celebration!
The new Stampin' Up! catalogue is out July 1st
with lots of new stamp sets and accessories to celebrate.
There will be
door prizes a plenty
yummy appetizers
some stamping projects for you to make
and many friends and customers to visit!
If you wish to attend, please RSVP by July 19
so I can have enough food and supplies for everyone.
I'm so excited to celebrate the new catalogue with you!!
This is where I hope to keep you updated on my Stampin' Up classes, schedule, projects, promotions, events, and anything else that I can think of to help you have more fun and develop more skills with your stamping crafts.
I'm new at the blog thing, so this will be a trial run for the first few months. Your input would be greatly appreciated.
I'm new at the blog thing, so this will be a trial run for the first few months. Your input would be greatly appreciated.
Subscribe to:
Posts (Atom)