Monday, November 26, 2007

WHAT IF YOUR INK PAD COMES APART!!

A friend of mine called me up with great concern over her retired Vintage Violet classic ink pad. The silly thing had come apart and she couldn't get it together again...it would dry up if she couldn't get it to go together soon!

Have you had that happen? It takes a bit of figuring to get it back together with the cool sliding mechanism designed for Stampin' Up! ink pads. The design allows the ink pads to be upside down when stored which keeps the surface of the pad moist.

I tried explaining how to put it back together again over the phone, but without a visual, it was pretty confusing. In the meantime, she wrapped it in plastic wrap. So, here it is. I hope it's helpful.

Figure #1

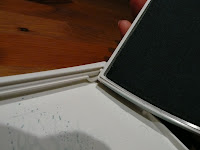
The pictures say more than I can. This first photo (figure #1) shows which ends to put together. The "outy part of the ink side goes into the inny part of the non-ink side" (I think that's about what I told my friend over the phone). Notice the sliding track where the "outy part" goes and that it goes in the end of the ink pad base that has the semicircle below the track.
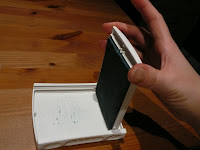
Figure #2

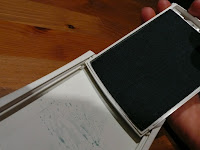
In figure #2, I'm trying to show how you "walk" the other "outy part" forward to fit it into the track.

Figure #3

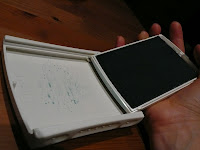
Then slide that second side back into the track while keeping the first side in its place as well (figure #3). Make sure you slide it as far as you can before trying to flip it back closed again.

Figure #4

Finally, you can flip the lid over to close it. (figure #4)

So, if you happen to have the Stampin' Up ink pads, this may one day be something that you have to do for yourself (you may have already done it). Just come back here and hopefully, these instructions will walk you through it.

Friday, November 23, 2007

Acetate Christmas


Can you say "Amy likes old olive!" Ya, I know, but old olive is just right for all things Christmas. I'll try to make my next card without olive, I promise!!


This one is made by stamping and embossing on acetate (overhead projector sheet). I used whisper white craft ink and embossed with iridescent ice embossing powder using my new Perfect Presentation hostess stamp set. Note: when embossing on acetate you need to be very careful not to overheat as you could melt the plastic. I then used my coluzzle cutter to make the oval window (textured soft sky and a piece of brocade background designer series paper). The paper piercing around the window didn't add as much as I'd hoped. The background stamp on the olive was done while masking off the oval centre so that the area behind the acetate would be plain.


Try embossing on acetate. It's a great effect!


Tuesday, November 20, 2007

Blog Candy Winner!!

I loved reading about all of your Christmas traditions. Some brought a tear to my eye as I thought of my own family and our traditions. I look forward to carrying ours on and creating new ones with my own family. I think my favorite Christmas tradition is Christmas eve. We always get together with an array of finger foods and treats, some tasty drinks (once I was old enough), and sit by the fire (a real one) with the Christmas tree (also real) lights twinkling. We'd visit and joke, often enjoying a special Ice Wine or Port (once I was old enough). I still look forward to that evening every year. As a child I also enjoyed being able to open our stockings before anyone else was up Christmas morning (we always had to wait for my oldest brother to get up...I think he did it on purpose), and I especially loved getting up before everyone else, turning on the Christmas tree lights and, with the rest of the house still dark and quiet, sitting or lying at the foot of that tree and bathing in its glowing delight.


Congratulations to the winner of my first blog candy offer!!!

CAKVD said...
OMG!!! I LOVE all these SU goodies!!! My favorite tradition is getting together to decorate the Christmas tree. We are all happy and together (even the cat joins in!)Thanks!Cheryl KVD


If you could email me your mailing address, I will send your candy asap.
CONGRATULATIONS!! And thank you everyone for sharing.

Friday, November 16, 2007

BLOG CANDY!!


Whooohooo! I've got over a thousand hits on my blog! Thanks everyone for visiting me!

I am pleased to offer my first blog candy. For a chance to win this assortment of Stampin' Up! and non-Stampin' Up! items, I would like you to leave a comment telling me what your favorite family Christmas tradition is and why. I'll draw the winner on Tuesday, Nov. 20th.
Among the loot:
-heavy weight stickers
-In Colour cardstock sample pack with coordinating ribbon
-Stampin' Dimensionals
-technique booklet
-cut and scored note cards and envelopes (very vanilla)
-rub-on transfers
-a couple cute stamps
-assortment of brads, buttons, flowers, and scallop circles.


Thursday, November 15, 2007

Happy Birthday to Melanie!


I made this card using the same card base as was used for my Christmas tree card on the previous post. The scalloped window is from Stampin' Up!'s "Accents and Elements" tin of stickers made with heavy weight paper. This one is from the Borders and Blossoms tin which are all in easy to use neutral colours.
I added depth to the card using Stampin' Dimensionals to pop-up the scalloped window. The image is a hostess set (Oh, So Lovely) which I first stamped on Soft Sky textured paper with Blue Bayou ink. Then I stamped the same image on my watercolour paper using Stazon black ink, coloured it with a blender pen and ink pad, and punched it out with a circle punch so it would fit behind my window.
I black embossed my Happy Birthday sentiment (from "It's Your Birthday" stamp set). Embossing adds such a nice finished look to projects. Another technique I often use is tearing my paper as I did with my layers at the bottom of this card.
This card uses River Rock, Soft Sky, Blue Bayou, and Purely Pomegranate.

Tuesday, November 13, 2007

HIT ME!!

Okay folks, I'm just not getting enough hits on this blog!

Soooooo....I'm going to give away some blog candy, but if you want it, you have to help me get to 1000 hits on my counter!

Seriously, it will be some great blog candy, you won't want to miss it.

Once I hit 1000, I will post what the candy will be and what you'll need to do to win it.

Spread the word about my blogsite and I'll do my best to post something at least once per week for you to look at.

Tuesday, November 6, 2007

Chistmas Tree


I just love this origami tree that Melanie showed me last year. It adds such beautiful depth to a card. This card was done for my open house. Again, I just love the pomegranate/old olive combo. And doesn't the Bravo Burgandy ribbon look lovely with the Purely Pomegranate paper. I was so excited to discover that colour combination. I used River Rock cardstock for the base and cut the card so that the back was wider than the front. I used old olive and purely pomegranate layered on the front with the 5/8" bravo burgandy grosgrain ribbon. The tree is made with the brocade background designer series paper. The background of the pomegranate paper is stamped using pomegranate ink with the flannel background stamp (a favorite for me at Christmas). The Season's Greetings is from Many Merry Messages stamp set and was heat embossed black. I was so pleased with this one. My husband helped me a bit...I had originally left the pomegranate blank and he suggested to add some sort of subtle background. I wonder if he might be a closet stamper. hehe.
Okay, I'm planning to do some blog candy when I hit 1000 on my counter. Be ready and I will post it properly when the time comes.