Monday, March 31, 2008

Consider Me Tagged!!

So, I was checking out Silke Ledlow's blog and read one of her posts where she was "tagged" to reveal 7 facts about herself. After her facts she wrote that anyone who read the blog post should consider themselves tagged also and reveal 7 facts of their own...I thought it could be fun, so here it goes...

1. I LOVE ladybugs. I think they represent the purity of the great outdoors and God's creation. I love that they are so cute but are absolutely vicious when it comes to aphids!! hehe. Unfortunately, I'm not vicious, just cute. :P

2. I'm a bit of a loner. I like my alone time and sometimes my need for it (with 2 toddlers I don't get much time to myself) takes time and energy away from the opportunity to develop relationships with friends.

3. I love the outdoors, but somehow don't get out there much. When I do have a chance, I love to go camping far away from people (forestry campsites are the best), or I'll get out for a run on a local path beside the river.

4. I grew up with holidays consisting of camping/hiking/canoeing trips. I did the West Coast Trail when I was 12 years old, the Bowren Lake chain when I was 15, and as I got older we continued to do some great adventures on the Broken Group, Tweedsmeir Park, Bunsby Islands, and many other trips that where only a bit less fantastic. I love my experiences and in no way do I feel ripped off that we never went to Disney Land. (I will find an opportunity to take my kids one day, though)

5. I hated cross-country skiing as a kid. I took classes every winter and was always the last kid, the complaining and cold kid in the group. I was miserable. Then I realized at about 12 years old that I was pretty good at it and it started to be fun. I raced in BC for a number of years and enjoyed some Loppets (kind of the equivalent of a marathon for running). I still really enjoy it, but as a family, I find it harder to get out.

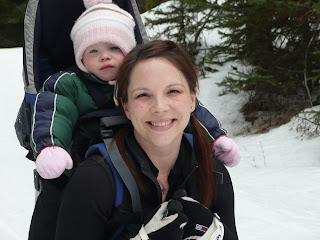
Here's a photo of me and my 2 year old out for a ski. She chatted in my ear happily the entire time we were skiing. Even though she's not smiling in this picture, she really did love it! Next year she'll be too heavy to carry, so she'll ride in a Polk (a sled that you pull behind you when you ski).

6. I'm a very messy housekeeper. If you come to my house and it looks tidy and clean, that's because I'm trying to pretend I'm like everyone else and cleaned my house like mad before you arrived!! If you come over and my house is a mess, that usually means that I'm finished pretending and I'm comfortable with you knowing the horrible truth about me!!

7. I like acting on stage. Started that in highschool. I was a shy, quiet kid who wanted to be an artist. I took art classed in grade 8, but the program in our school forced you to do half a year in art and half a year in drama. I won an award for drama and wasn't recognised for my artwork, so I took drama in grade 9, 10, 11, and 12!! Sorry to say my drawing abilities have gone downhill, but I still am involved in drama in my church. I've always loved the idea of being in a community theatre production, but most often, it seems, they do musicals, and I CAN'T SING!!

So, there you have it. My seven facts.

I have some cards to show you soon. Just have to take some pictures of them first.

Thursday, March 27, 2008

Upcoming blog candy!!

I know I haven't been very active on my blog site. I apologize for that. My pregnancy has been a bit rough this first trimester with nausea and fatigue, so my stamping activities have been affected.

I have good news! I will be posting some great blog candy when my blog hits 3000! There will be a Stampin' Up stamp set among the loot, plus a few extras! So keep visiting because you won't want to miss it!

I promise to put up a new project soon for you to check out as well. Remember to comment on what you see if you like it. It will spur me on to show you more projects. I will feel like my time is well spent with each comment I receive from you.

Thursday, March 13, 2008

Faux Silk Pocket Card

This is a lovely technique that is really very simple. I'm very pleased with how this card turned out. I made it for my faithful customer and friend, Gwen, as a make-and-take project for her stampin' party with my other most faithful customers and friends!! Gwen requested a pocket card with a book mark inside. This is what I came up with.

I decribe in brief how to do the faux silk technique on a previous post. For this one, I used my new Pretty Petals background stamp and inked it using Stampin' Up markers. Once inked, I huffed my breath over the inked stamp before stamping it on my tissue paper to re-moisten the ink. The base of my card is made with kraft cardstock (I've been using that a lot lately). I also used purely pomegranate, groovy guava, and whisper white cardstock. The "thank you" is done with one of the new rub-on's from Stampin' Up. Of course, the background stamp was also used on the kraft paper, but done in Versamark ink for a subtle look.


The bookmark was made with the same colours and techniques. I used a jumbo eyelet at the top to put the bravo burgandy and double stitched groovy guava grosgrain ribbon through. The "happiness" was stamped using my ABC lower alphabet set and heat embossed with white embossing powder.


This card has a number of steps. I won't explain them all unless you have questions as it would be an aweful lot.

Hope you like my card and bookmark!

Friday, February 29, 2008

For My Valentine

I made this card for my DH on Valentine's Day. I needed it to be relatively simple as I started it that morning and wanted to finish before he woke up. I had to do a do-over with the buckle chipboard once, because I bent it and smudged the ink...the joys of working with the slower drying craft ink!


I used the Kraft paper for the base. The chipboard buckle and heart are from Stampin' Up's On Board chipboard. I started by using Whisper White craft ink to cover the buckle. I did it a couple times, heat setting it with my heat gun in between coats (it still doesn't completely set this way, but it helps reduce mess, oh, and it smoked just a little bit...hehe). Once I was satisfied that it wouldn't get any whiter, I used my Real Red craft ink and the hearts stamp from the hostess set "A Little Bit of Happiness" to apply over the white ink, then I clear embossed over that so that the red inked image became raised and shiny (hard to see in this photo). The heart was inked thoroughly with the real red craft ink and clear embossed twice to give a glossy finish. This changes the true red color a bit, so I opted for the Bravo Burgandy 1/4" grosgrain ribbon to attach the buckle to the card (I also secured the buckle to the paper with some Sticky Strip). The heart was attached to the cardstock with a couple Stampin' Dimensionals. I used a favorite retired stamp inside the card with the sentiment: "I love you more today than yesterday, but less today than I will tomorrow".

Tuesday, February 19, 2008

A Simple Kid's Card

I haven't been doing very much stamping lately. Not feeling terribly creative, I'm afraid. Here's a simple card I put together for my nephew's 7th birthday. I used Garden Green for my base color, then used Summer Sun to mat the birdie image. The Whisper White cardstock is edged with Garden Green ink using a Marvelous Marker. I also coloured the image (from the stamp set "Pun Fun") using my Stampin' Up! (SU) Marvelous Markers and a blender pen to pull the colour around a bit to give a simple water coloured look. The ribbon is SU's More Mustard 1/4" grosgrain ribbon. And to give a bit more pop, I used my handy dandy Stampin' Dimensionals to adhere the matted image to the green cardstock.

I would be much more impressed with myself if I not only managed to make a card, but actually got it in the mail before his birthday!

Tuesday, February 5, 2008

Cards, cards, cards

I haven't done much lately. These cards I made a couple weeks ago at an all day stamp event. I was there for 8 hours and managed to make 4 cards!! Oh well, I do like how they turned out.

This first card is a baby card using Stampin' Up! craft paper for the base, Ruby Red and Groovy Guava. I used the Kraft taffeta ribbon and did some faux stitching on the strip of Groovy Guava near the bottom. This is done by piercing a row of holes, then connecting the dots with a white gel pen (Stampin' Up! has a very nice one). I used this technique on all of these cards...I guess I was a little stitch happy. I used Stampin' dimensionals to raise the large rectangle as well as the smaller rectangle on top of it. The image is embossed with black embossing powder and the stamp is from "Sweet Thing" stamp set. Finally, I used my corner rounder punch to add the scalloped edge at the bottom of the card. Oh, and the patterned paper is Groovy Guava Prints Designer paper.


This card is clearly similar to the one above. I just used Wild Wasabi, Certainly Celery, and Garden Green instead of the pink combo above. The ribbon is the Wild Wasabi double stitched ribbon. I think that the striped Wild Wasabi (it's new in the catalogue this season) would have looked good with this as well.


This card is similar to the first. I needed to swap the Kraft ribbon for the Guava double stitched ribbon when I used the white cardstock for the stamped image as the Kraft ribbon just looked dingy next to the white paper. The stamped image is from the "It's All Good" stamp set, which, after stamping with Ruby Red classic ink, I quickly embossed it with clear embossing powder. I heard from Beate Johns that you can make a smoother look if you quickly add more embossing powder when your image is still warm and heat emboss it again. I must agree, it does look more finished that way. I punched out the image with my circle punch (1-1/4", I think) and adhered it with Stampin' Dimensionals to the Ruby Red scallop circle (used my scallop punch).


This last card is a similar layout to one I posted not very long ago. The stamp set is, again, from the "It's All Good" set and I double embossed it with clear embossing powder over Old Olive ink. I used my 1-1/4" square punch to cut it out and my 1-3/8" square punch to frame it in Old Olive paper. The background is Kraft cardstock and I used Summer Sun and Real Rust cardstock, which I sponged the edges of with a slighly darker ink to give a sort of antiqued look. The Kraft cardstock is also sponged around the edges. The ribbon is Chocolate 15/16th" Satin Ribbon which you can find in Stampin' Up!'s Ribbon Original Theatre set. And I used a piece of hodgepodge aged copper hardware to embellish the ribbon using the technique I showed you in one of my earliest posts. Stampin' Dimensionals once again add depth to my card by slightly raising up the stamped image.


Hope you like these cards. Thanks for visiting!

Sunday, January 20, 2008

Another Canvas

I did my first canvas class today and I think it went well. I like to encourage individual creativity with projects as much as I can. Everyone in the class did something different, it was great! In hind site I wish I had taken photos of everyone's artwork so I could display them here for you to see. They all turned out so beautifully even though the embossing powder seemed to be a bit finnicky and unreliable.


My canvas here is done with an acrylic painted background in the black and dark chocolate colours. We used a Heidi Swapp mask which I purchased through Lisa's Scrap Shack with very reasonable shipping expenses. We used Versamark over the mask, removed the mask, then applied clear thick embossing powder and melted it with a heat tool. The photo is of my sister-in-law and family which I mounted on the black and old olive paper. I used a small piece of patterned paper to make the little photo corner and used wide old olive grosgrain ribbon along with the wide chocolate satin ribbon and 1/4" black grosgrain ribbon as accents.


I like how it turned out, but I'm looking forward to playing around with different ways of decorating the canvas in the future. I've seen some very beautiful pieces out there and have a few ideas up my sleave, too.


If any of you have done canvas scrapping projects, I'd love to see what you've done and have you share any tips you may have. Feel free to leave a comment and a link to your photo if you have one!