Christmas wasn't always a celebration of Jesus for me. Christmas was about love; it was about family; it was about peace on earth and good will toward men. All these things are good things. But, I first understood the true meaning of Christmas 10 years ago, when I made a choice to follow the teachings and the love of Jesus. My life attitude has been very different since then and many of my life activities have changed. I wouldn't say that life is easier, in fact, in many ways it's more difficult as I wrestle down my faults and do my best to show God's love through my actions. I still have many challenges and struggles and I am very humanly flawed, but I know that I am not doing it alone. My struggles are building my character and teaching me about faith. God provides me with His guidance through it all (hopefully I'm listening) and I frequently find myself leaning on Him for support during the trials of life. I am ever grateful that I can put my life in His hands knowing that He sees the bigger picture and has ultimate and intimate understanding of my thoughts and experiences.
What is the true meaning of Christmas in your life? I know that everyone does not believe the same as I do. I hope that you will take a moment to reflect on this season... Is it about the presents under the tree? I love the tradition of giving and receiving and being thankful... Or is it more about spending time with the ones you love, making amends, maybe offering grace for their shortcomings (we all have them), and showing them how much you love them and how grateful you are for having them in your life? ... Or maybe you struggle at Christmastime. Maybe it brings with it a sadness; some loneliness, maybe some bitterness. I hope not. I hope that you will find peace this season. I hope you will find joy. I hope that you will discover a deeper meaning, far beyond the commercialism which envelopes our Christmas celebrations.
Merry Christmas to you and yours wherever you are. I wish you peace and joy at this special time of year.
Wednesday, December 26, 2007
Wednesday, December 19, 2007
How to Use the Stamp-a-ma-jig
I made good use of my Stamp-a-ma-jig while making my Christmas cards this year. When used properly, it's a great tool to help you position your stamp images with precision. No more crooked words! It's great if you're looking for precise overlapping of images also. Here's a little tutorial to show you how it works:
 1. Start by lining up your clear image sheet into the side of your "jig" being sure it's neatly tucked in and flush with the edges.
 2. While holding your jig and the clear sheet steady, line up your stamp flush and snug into your jig and slide it down to stamp your image on the clear sheet.
 3. The clear sheet then becomes your guide for positioning your stamp onto your project.
 4. Lay your clear sheet over your project to where you want the image to be. Then line your jig up snug as you did before while you hold your image sheet in place over your project.

5. Remove the imaging sheet while firmly holding the jig in place.
 6. In the same fashion as you did when stamping on the clear sheet, you will hold the jig firmly in place, line up your stamp flush and snug into the jig and slide the stamp down to stamp the image on your project.

 1. Start by lining up your clear image sheet into the side of your "jig" being sure it's neatly tucked in and flush with the edges.
  2. While holding your jig and the clear sheet steady, line up your stamp flush and snug into your jig and slide it down to stamp your image on the clear sheet.
  3. The clear sheet then becomes your guide for positioning your stamp onto your project.4. Lay your clear sheet over your project to where you want the image to be. Then line your jig up snug as you did before while you hold your image sheet in place over your project.
5. Remove the imaging sheet while firmly holding the jig in place.
 6. In the same fashion as you did when stamping on the clear sheet, you will hold the jig firmly in place, line up your stamp flush and snug into the jig and slide the stamp down to stamp the image on your project.
I love how little effort it took to center my "noel" onto my card!
Thursday, December 13, 2007
MORE Christmas Cards!!

After making 40 cards for all of the people involved in the Christmas production, I had to do all of the Christmas cards for my family and closest friends. I got the idea for these cards from kwernerdesigns and adapted it for the supplies that I had on hand (thankfully, I took great advantage of last month's Stampin' Up! promotion and got loads of paper!...phew!!) I also needed them to be simple so that I could make them quickly.

I like how they turned out, but I ended up destroying my Coluzzle cutting mat doing all those special circles. I think my blade had gotten dull with use and it ended up tearing through my mat. I think I can get a replacement at a local craft store without having to re-purchase my whole Coluzzle kit.
Some of the red ones with the green ribbon remind me of Norwegian artwork and designs (my Great-Grandmother came to Canada from Norway). I think for that reason those ones are my favorites.

Tuesday, December 4, 2007
40 Cards!

 I made 40 cards for our cast and crew to thank them for doing such a great job in our Christmas play at our church. We performed a play called "The Best Christmas Pageant Ever". It was a hoot!! Everyone in the cast had to play kids, so it was a great excuse to goof off and have a lot of fun. I wore high pigtails, a cute little skirt, freckles, false eyelashes, and LOTS of dark pink (kind of like this Rose Red paper).
 This photo shows some of the color combos that I used for my cards. The ones with the Rose Red and the Not Quite Navy cardstock base are probably my favorite combinations. I started out by using the Flannel background stamp, but when I used my Print Patterns background stamp, I liked the playful look it made better. After stamping the snowflake from the Perfect Presentation hostess stamp set, I inked the entire 1-1/4" square of paper with Versamark and heat embossed the paper with iridescent ice embossing powder. It added a touch of glitter, which just seems to make a Christmas card complete.
Now I have to get my butt in gear and make another 50 or so Christmas cards to send out to my family! I better get a move on!
Even though it's such a busy time of year....I LOVE Christmas!!!
Monday, November 26, 2007
WHAT IF YOUR INK PAD COMES APART!!
A friend of mine called me up with great concern over her retired Vintage Violet classic ink pad. The silly thing had come apart and she couldn't get it together again...it would dry up if she couldn't get it to go together soon!
Have you had that happen? It takes a bit of figuring to get it back together with the cool sliding mechanism designed for Stampin' Up! ink pads. The design allows the ink pads to be upside down when stored which keeps the surface of the pad moist.
I tried explaining how to put it back together again over the phone, but without a visual, it was pretty confusing. In the meantime, she wrapped it in plastic wrap. So, here it is. I hope it's helpful.
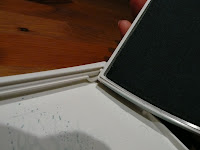
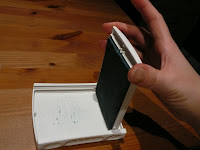
The pictures say more than I can. This first photo (figure #1) shows which ends to put together. The "outy part of the ink side goes into the inny part of the non-ink side" (I think that's about what I told my friend over the phone). Notice the sliding track where the "outy part" goes and that it goes in the end of the ink pad base that has the semicircle below the track.
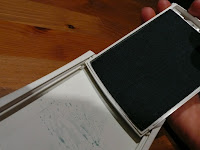
In figure #2, I'm trying to show how you "walk" the other "outy part" forward to fit it into the track.
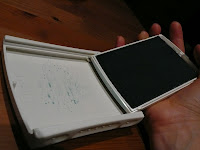
Then slide that second side back into the track while keeping the first side in its place as well (figure #3). Make sure you slide it as far as you can before trying to flip it back closed again.
Have you had that happen? It takes a bit of figuring to get it back together with the cool sliding mechanism designed for Stampin' Up! ink pads. The design allows the ink pads to be upside down when stored which keeps the surface of the pad moist.
I tried explaining how to put it back together again over the phone, but without a visual, it was pretty confusing. In the meantime, she wrapped it in plastic wrap. So, here it is. I hope it's helpful.
Figure #1
The pictures say more than I can. This first photo (figure #1) shows which ends to put together. The "outy part of the ink side goes into the inny part of the non-ink side" (I think that's about what I told my friend over the phone). Notice the sliding track where the "outy part" goes and that it goes in the end of the ink pad base that has the semicircle below the track.
Figure #2
In figure #2, I'm trying to show how you "walk" the other "outy part" forward to fit it into the track.
Figure #3
Then slide that second side back into the track while keeping the first side in its place as well (figure #3). Make sure you slide it as far as you can before trying to flip it back closed again.
Figure #4
Finally, you can flip the lid over to close it. (figure #4)
So, if you happen to have the Stampin' Up ink pads, this may one day be something that you have to do for yourself (you may have already done it). Just come back here and hopefully, these instructions will walk you through it.
Friday, November 23, 2007
Acetate Christmas


Can you say "Amy likes old olive!" Ya, I know, but old olive is just right for all things Christmas. I'll try to make my next card without olive, I promise!!
This one is made by stamping and embossing on acetate (overhead projector sheet). I used whisper white craft ink and embossed with iridescent ice embossing powder using my new Perfect Presentation hostess stamp set. Note: when embossing on acetate you need to be very careful not to overheat as you could melt the plastic. I then used my coluzzle cutter to make the oval window (textured soft sky and a piece of brocade background designer series paper). The paper piercing around the window didn't add as much as I'd hoped. The background stamp on the olive was done while masking off the oval centre so that the area behind the acetate would be plain.
Try embossing on acetate. It's a great effect!
Tuesday, November 20, 2007
Blog Candy Winner!!
I loved reading about all of your Christmas traditions. Some brought a tear to my eye as I thought of my own family and our traditions. I look forward to carrying ours on and creating new ones with my own family. I think my favorite Christmas tradition is Christmas eve. We always get together with an array of finger foods and treats, some tasty drinks (once I was old enough), and sit by the fire (a real one) with the Christmas tree (also real) lights twinkling. We'd visit and joke, often enjoying a special Ice Wine or Port (once I was old enough). I still look forward to that evening every year. As a child I also enjoyed being able to open our stockings before anyone else was up Christmas morning (we always had to wait for my oldest brother to get up...I think he did it on purpose), and I especially loved getting up before everyone else, turning on the Christmas tree lights and, with the rest of the house still dark and quiet, sitting or lying at the foot of that tree and bathing in its glowing delight.
Congratulations to the winner of my first blog candy offer!!!
CAKVD said...
OMG!!! I LOVE all these SU goodies!!! My favorite tradition is getting together to decorate the Christmas tree. We are all happy and together (even the cat joins in!)Thanks!Cheryl KVD
If you could email me your mailing address, I will send your candy asap.
CONGRATULATIONS!! And thank you everyone for sharing.
Subscribe to:
Posts (Atom)