Friday, April 18, 2008

Time for Blog Candy!!

I've had over 3000 hits now and would like to give you a chance to get some free stuff to help me celebrate!! I have a stamp set (from Stampin' Up's Sale-a-bration 2008) as well as a small assortment of 12x12 papers including textured ones, a couple embossed samples (done with my cuttlebug) along with some embellishments and a couple other items.

If you want this stuff mailed to your house all you have to do is leave me a comment on this post and give me some baby name suggestions for my baby-to-be in September. I don't know if I will have a boy or a girl, so please suggest one of each! If you know the meaning of the name, that would be extra cool! I will pick a random winner next week. Make sure you leave your email address so I can contact you.

Thanks for looking at my blog!

Wednesday, April 16, 2008

Sooo Close to 3000 hits and Blog Candy!!

We're only 25 or so hits away from the blog candy being posted. I'll only look once per day to see if I can post the prize. As soon as I see I've reached 3000 hits, I'll show you what you can win...but you're going to have to work for it!!

Mwaahahahaaa!!

(Okay, okay, I won't make you work too hard.)

Altered Canvas #3


This one was inspired by a layout I saw in a Close to My Heart catalogue. I needed to use colors to somewhat coordinate with the very first canvas I did. Stampin' Up didn't have any colors that were an exact match to that canvas (which was done in a scrapbook store in Abbotsford), so these were as close as I could get.
I first applied my Close to Cocoa ink pad directly to the canvas and rubbed it evenly across the surface, adding a little extra around the edges for a distressed look. The ink came out more like Chocolate Chip than Close to Cocoa...must be a combination of the surface medium plus the direct from ink pad concentrated approach. Now I'm too impatient to wait for the ink to dry, so I then took the time to sprinkle my clear embossing powder over the entire canvas surface (manageable sections at a time) and heat embossed it with my heat gun. It not only "dries" the ink, but it also adds a subtle sheen to the canvas.

The color combination I used is Bashful Blue, Creamy Caramel and Basic Black. To try to get the caramel more golden, I sponged on some More Mustard ink and a touch of Close to Cocoa on the edges of the Creamy Caramel paper. The Bashful Blue is also sponged around the edges with the Close to Cocoa ink.


I also used my new Cuttlebug to make the dry emboss diamond impressions on the one piece of Creamy Caramel paper (The Cuttlebut is so fun and easy to use, it's almost embarrassing!). The photo of my son is distressed aroung the edges with Stampin' Up's distressing tool and I puffed up the photo with my handy dandy stampin' dimensionals. The only stamp I actually used for this canvas is in the bottom left corner from the "It's All Good" stamp set. The stars have been inked with Bashfull Blue and More Mustard and are chipboard from the "On Board Accents" collection. I also used Jumbo eyelets, brads from my hodgepodge hardware, black hemp twine, and More Mustard grosgrain ribbon as embellishments.


I really struggled with what to put in the space where the stars are. The stars alone didn't seem like enough, but anything else just looked like clutter. Adding the brads with the stars was all I needed in the end to feel like I had balanced the space without making it look like I "tried to hard".

In the end, I'm pleased with how it turned out. I have to actually find where I can hand it on the wall now. That seems just as challenging as creating it in the first place!! lol!

Wednesday, April 9, 2008

Another bookmark card


Here's a card I made by playing around with my rub-ons. Most of the images are done with rub-ons, except for the word "smile" which was done with my Rough Edge alphabet set and the bookmark has a couple stamps on it from the sets "Merci" and "Smarty Pants".
This is another pocket card with a bookmark in it...it's actually my first attempt. You can't see it in the picture, but the bookmark comes out of the pocket on the back of the card instead of the front. That was due to an error in adhering my pocket closed!
I tried making a narrow bookmark for this card, but found it slid around in a very untidy manner in the pocket, so I had to get creative to have it hold still (I slipped a bit of glue on either side of the inside of the pocket and slapped on an eyelet to help hold the bookmark more securely). My next bookmark card had a wider bookmark to avoid all of the fuss.

I don't love this card, but it's nice and I like it enough that I wouldn't be embarrassed to give it away.

One thing that I do like about it though is how quick it was to make using the rub-ons. They are so tidy and mess free. Needless to say, I have bought more since.
Thanks for looking.
I'm getting closer to 3000 hits, so keep watching for upcoming blog candy!!

Monday, March 31, 2008

Consider Me Tagged!!

So, I was checking out Silke Ledlow's blog and read one of her posts where she was "tagged" to reveal 7 facts about herself. After her facts she wrote that anyone who read the blog post should consider themselves tagged also and reveal 7 facts of their own...I thought it could be fun, so here it goes...

1. I LOVE ladybugs. I think they represent the purity of the great outdoors and God's creation. I love that they are so cute but are absolutely vicious when it comes to aphids!! hehe. Unfortunately, I'm not vicious, just cute. :P

2. I'm a bit of a loner. I like my alone time and sometimes my need for it (with 2 toddlers I don't get much time to myself) takes time and energy away from the opportunity to develop relationships with friends.

3. I love the outdoors, but somehow don't get out there much. When I do have a chance, I love to go camping far away from people (forestry campsites are the best), or I'll get out for a run on a local path beside the river.

4. I grew up with holidays consisting of camping/hiking/canoeing trips. I did the West Coast Trail when I was 12 years old, the Bowren Lake chain when I was 15, and as I got older we continued to do some great adventures on the Broken Group, Tweedsmeir Park, Bunsby Islands, and many other trips that where only a bit less fantastic. I love my experiences and in no way do I feel ripped off that we never went to Disney Land. (I will find an opportunity to take my kids one day, though)

5. I hated cross-country skiing as a kid. I took classes every winter and was always the last kid, the complaining and cold kid in the group. I was miserable. Then I realized at about 12 years old that I was pretty good at it and it started to be fun. I raced in BC for a number of years and enjoyed some Loppets (kind of the equivalent of a marathon for running). I still really enjoy it, but as a family, I find it harder to get out.
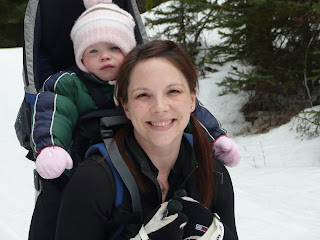
Here's a photo of me and my 2 year old out for a ski. She chatted in my ear happily the entire time we were skiing. Even though she's not smiling in this picture, she really did love it! Next year she'll be too heavy to carry, so she'll ride in a Polk (a sled that you pull behind you when you ski).

6. I'm a very messy housekeeper. If you come to my house and it looks tidy and clean, that's because I'm trying to pretend I'm like everyone else and cleaned my house like mad before you arrived!! If you come over and my house is a mess, that usually means that I'm finished pretending and I'm comfortable with you knowing the horrible truth about me!!

7. I like acting on stage. Started that in highschool. I was a shy, quiet kid who wanted to be an artist. I took art classed in grade 8, but the program in our school forced you to do half a year in art and half a year in drama. I won an award for drama and wasn't recognised for my artwork, so I took drama in grade 9, 10, 11, and 12!! Sorry to say my drawing abilities have gone downhill, but I still am involved in drama in my church. I've always loved the idea of being in a community theatre production, but most often, it seems, they do musicals, and I CAN'T SING!!

So, there you have it. My seven facts.

I have some cards to show you soon. Just have to take some pictures of them first.
Thursday, March 27, 2008

Upcoming blog candy!!

I know I haven't been very active on my blog site. I apologize for that. My pregnancy has been a bit rough this first trimester with nausea and fatigue, so my stamping activities have been affected.

I have good news! I will be posting some great blog candy when my blog hits 3000! There will be a Stampin' Up stamp set among the loot, plus a few extras! So keep visiting because you won't want to miss it!

I promise to put up a new project soon for you to check out as well. Remember to comment on what you see if you like it. It will spur me on to show you more projects. I will feel like my time is well spent with each comment I receive from you.

Thursday, March 13, 2008

Faux Silk Pocket Card

This is a lovely technique that is really very simple. I'm very pleased with how this card turned out. I made it for my faithful customer and friend, Gwen, as a make-and-take project for her stampin' party with my other most faithful customers and friends!! Gwen requested a pocket card with a book mark inside. This is what I came up with.

I decribe in brief how to do the faux silk technique on a previous post. For this one, I used my new Pretty Petals background stamp and inked it using Stampin' Up markers. Once inked, I huffed my breath over the inked stamp before stamping it on my tissue paper to re-moisten the ink. The base of my card is made with kraft cardstock (I've been using that a lot lately). I also used purely pomegranate, groovy guava, and whisper white cardstock. The "thank you" is done with one of the new rub-on's from Stampin' Up. Of course, the background stamp was also used on the kraft paper, but done in Versamark ink for a subtle look.


The bookmark was made with the same colours and techniques. I used a jumbo eyelet at the top to put the bravo burgandy and double stitched groovy guava grosgrain ribbon through. The "happiness" was stamped using my ABC lower alphabet set and heat embossed with white embossing powder.


This card has a number of steps. I won't explain them all unless you have questions as it would be an aweful lot.

Hope you like my card and bookmark!